Wednesday, December 29, 2010

Stampers 6 Clubs

With a fresh new year almost upon us, I am starting up a new Stampers 6 Club!!! Would you be interested in learning new techniques every other month? Maybe try some new products Stampin’ Up! comes out with? No obligation to clean your house, invite guests or prep food, but still have an opportunity to earn Stampin’ Up’s amazing hostess rewards while enjoying a fun night out with the girls? Joining a Stampers 6 Club may be just want your looking for!

What is a Stampers 6 Club? It’s a great opportunity to meet other stampers who love and enjoy stamping as much as you do while spending an evening doing just that! I keep my clubs small (groups of 6 people) so the evenings are fun and relaxing. We meet in my home once every other month over the course of a year (works out to 6 club meetings). Each time we meet, I’ll have new and exciting projects we’ll stamp – we may learn new techniques or try using new products! If there is a particular technique or product you’d like to try, I will certainly do my best to accommodate that during the club! Each club member will have the opportunity to receive all the hostess benefits and rewards from that club meeting during the duration of the club!

Here are a few of the club projects I've offered at previous clubs:


What’s required? At each club meeting, each club member is required to place a single Stampin’ Up! order of a minimum of $35. This guarantees that each club member will receive the hostess rewards.

I would LOVE to start up a new club in January. If you’re interested in joining a club or maybe you have a group of friends who would like to join as your own club, definitely let me know!

Questions? Send me an email or give me a call and I would be happy to answer any questions you have.

I look forward to hearing from you!

Happy Stamping!


Thursday, December 16, 2010

A Ribbon Slider Card - Dress up a Gift Certificate!

I LOVE gift certificates...I love giving them...I love receiving them. When I give someone a gift certificate though, I usually try to "dress it up" a little just to personalize the gift a bit. I've found that a ribbon slider card is perfect for gift certificates! This is one I made with my downline the other night.  (Click the pics for a closer peek)


It fits a standard size gift certificate perfectly!  Pull up on the ribbon and the card slides up out of the pocket!


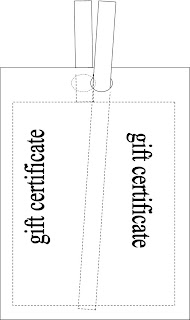
If you're like me, you probably need to see a picture to fully understand how this is supposed to work. ;)  I've attempted to put together a rough drawing to explain it:

 
The ribbon is threaded through two punched holes at the top of the red cardstock with one "tail" on each side of the card.  The gift certificate is placed in the center of the ribbon and pushed down into the pocket pushing the ribbon down at the same time. (The ribbon keeps the card from sliding out the bottom of the pocket)  Then, the ribbon is tied at the top.  When you pull up on the ribbon, it slides the gift certificate up with it.
 

Add a package of hot chocolate mix and you've got a quick little stocking stuffer or gift for a friend or coworker.


SO cute!!!  Depending on the size of the pocket, this would also work with a package of gum or any other flat item!  If you're interested, I would be happy to post a simple tutorial so you can make your own!  Just leave me a comment below to let me know!

Happy Stamping!


Tuesday, December 14, 2010

12 Days of Christmas Count Down

I wanted to do something different this year and surprise my hubby with my own "12 Days of Christmas" count down. I've seen a few different versions and decided to keep it simple. I cut out 12 small boxes using my Big Shot and my Candy Wrapper die.  (An even simpler design would have been to use stamped envelopes).   I kept the decorating to a minimum and just used a punched piece of retired Christmas designer paper I had on hand along with a number I printed off my computer.  (Click the pics for a closer peek)


Each box contains a small slip of paper with the name of a "gift" on it. I've included a number of items including a box of his favorite cookies, a "date night in" allowing him to choose the movie, chocolates, etc.  (I really hope he's not reading this!!!) ;)


Along with the first box he received this morning, I'd written a quick note in a Christmas card just explaining the boxes.  I think he liked it!

Happy Stamping!

Thursday, December 9, 2010

Pretty Poinsettia

One of the other hobbies that takes up some of my spare time is home decorating. I love shopping at thrift stores and garage sales searching for those hidden "treasures" to decorate our home. I'm also a huge fan of finding over priced items and then recreating them for a fraction of the cost!

One of the items I've seen a lot recently are pillows with beautiful fabric poinsettia flowers. I can sew and enjoy it, so when I started seeing these gorgeous pillows popping up online, I decided I wanted to try my hand at one. Rather than cut out each individual petal by hand, I decided to cut them out using my Big Shot and my 5 Point Star Bigz Die.

I had some thick white and green felt in my fabric stash and so I starting cutting. I sewed them together, added a few gold bells and I was finished! I'm so happy with the way it turned out!!!  (Click the pics for a closer peek)


Wouldn't this look adorable attached to a headband for a little girl?  Or what about an inexpensive present topper!  Decorations on a mantel?  So many ideas!!!


Now I just need to sew the actual pillow to attach it to.

Hope you like it!


Monday, December 6, 2010

For Sale Items - Updated!!!


I've just added a couple items to my "For Sale" list. Take a peek and definitely let me know if anything catches your eye.

Happy Stamping!


Friday, December 3, 2010

So, how much IS that?

You've probably seen Stampin' Up!s new Designer Fabric in the mini catalogue and noticed it's listed as a "fat quarter". Maybe you don't sew, or maybe you're like me and do sew, but still have no idea how much fabric that actually is! I "googled" it online and found this answer:

What is a Fat Quarter:  It's a quilters' cut of (usually) cotton fabric or other good quilting fabrics. It's a quarter yard of 44" wide fabric, but instead of being a strip that's 9" x 44" as it would be if you just bought 1/4 yd of fabric off the bolt, a fat quarter is an 18" x 22" rectangle. A piece of fabric 36" (1 yard) x 44" is cut into 4 equal pieces.

Fat eighths are 11" x 18" in case you see those advertised somewhere, too.


AND just because I'm a very visual learner, here's a picture:


With the 50% off sale on our fabric last week, I decided to order a package of each; our Candy Cane Christmas and our Deck the Halls.

Each package contains 3 different fabrics neatly folded up.  The Candy Cane Christmas came in a clear cello wrap and the Deck the Halls arrived in a white box...not sure why but that's fine. ;) 

I ripped the packages open as soon as they arrived...and immediately wished I'd ordered more!  The colors are absolutely GORGEOUS!!! I can see these looking beautiful folded and on display on an open shelf! ;)

I'd also forgotten that each package comes with a project brochure with directions for a few fabric projects.  Click on the pics for a closer peek:

Candy Cane Christmas


Candy Cane Christmas (fully unfolded)


Deck the Halls 
(partially unfolded - I just wanted to show you the patterns/colors)


You may notice that Stampin' Up! advertises the fabric as an Extra Fat Quarter.  I grabbed a measuring tape and quickly noticed that each piece is 18" x 28" - that's 6" wider than a regular fat quarter. :)

Gorgeous!  I can't wait to incorporate this beautiful fabric in to some of my craft projects.

Oh, and just something to keep in mind...with the release of our upcoming Occasions Mini on January 4th (as a demonstrator I've already received my copy of the mini), there may possibly be more gorgeous fabric coming. *wink*   Oh my gosh - I am in SO much trouble!!! ;)

Happy Stamping!


Tuesday, November 30, 2010

The Countdown Begins...

Ok, so I guess the countdown doesn't start until tomorrow, but I was just too excited to show you what I've made! It's a countdown-to-Christmas calendar I created with My Digital Studio! (Click the pics for a closer view)


This particular one is a 5x7 size so it'll fit in a regular frame I already have here. Using a dry-erase marker, my boys can count down the days (and hopefully stop asking me the "how many more days, mom" question!


Because I made this up yesterday, I don't have time to send it through to Stampin' Up!'s professional print company, so I just printed it on regular copy paper on my home printer.

The benefit of My Digital Studio is I was able to add all the bulky embellishments I wanted, but because it's digital, it's all completely flat and sits behind the glass. :)


I just LOVE the new Cherry Cobbler Seam Binding Ribbon and Antique Brads!


I'm sure my boys will enjoy crossing off each day on the calendar and writing the remaining days in the box.  My oldest already filled in the days til Christmas box.  (Is it just me or is it almost impossible to believe there are actually only 25 days left to go?!)


Definitely let me know if you have any questions!

Happy Stamping!


Saturday, November 27, 2010

Progess continues...

Well, my craft room mini reno still isn't finished. I've spent the afternoon/evening in there with my nail gun, air compressor, wood filler and paint, so I'm definitely getting closer!!! ;)  Anyone with young kids will completely understand why something that seemed so simple in the beginning is taking me F.O.R.E.V.E.R to finish! *rolling eyes*  I know it'll be worth it when it's done. :)

Here's a little sneak peek of the progress:


And my new friends that help speed up the progress:


Progress is slow, but at least it's happening!


And just to prove I'm actually still crafting during this mini mess, here's one of the projects I did with my Stampers 6 Club this past week.  It uses multiple punches and was a lot of fun to put together.


How adorable are they?! :)

Happy Stamping!


Tuesday, November 23, 2010

Another Mojo Monday

The sketch for this Mojo Monday seemed like a simple design and I wanted to try my hand at a card right away.  

My daughter had fallen asleep in her highchair this morning, so rather than attempt to move her (which I knew would be highly unsuccessful!) I just opened My Digital Studio on my computer (which is right next to her chair) and started creating!

I limited myself to only certain cardstock colors - Wild Wasabi, Marina Mist, Early Espresso & Whisper White.  I came up with two cards fairly quickly!

This first one is a non-traditional Christmas card and pretty much copies the original sketch:


 This second card is the same sketch, only the layout has been turned so it's now landscape:


I can't wait to create these cards using "real" product.  :)

Just a reminder - My Digital Studio is 50% off right now as part of our "Online Spectacular" sale, but only until November 30th!!!

Happy Stamping.


Candle Stamping Class

Are you looking for a last minute gift? Maybe you're looking for a unique gift for a teacher, coworker or hostess gift! Join me and I'll show you how to stamp your own candles! 


(example of candles I've stamped)


We will be stamping 3 votive candles and coordinating gift tags.  Cost is $15 for the class and is on Tuesday, December 7th at 7:30 pm.
I've only got room for 8, so if you are interested contact me right away to secure your spot. RSVP is required by December 1st to give me time to prep the project materials.

Don't miss out on making this gorgeous gift for a family member or friend - there is nothing more special than a handmade gift.


Monday, November 22, 2010

Online Spectacular!


For nine days only—November 22-30—get FREE SHIPPING on orders over $200! Plus you can save up to 50 percent off select Stampin’ Up!® products—including My Digital Studio software and Designer Fabric!

Interested in digital paper crafting?  Take a peek at what I've done with the My Digital Studio software.  I LOVE this program!!!   And don't forget the fabric!!!  I've had our Deck the Halls fabric on my wishlist for a little while - I'm ordering it this week!!!  Can't WAIT!!! :)


View this PDF for details or visit my Online Store to see the complete list of discounted items.

Happy Stamping!


Thursday, November 11, 2010

Simply Amazing Business Opportunity - SOOO Exciting!!!!


OH MY GOSH - I could hardly believe what I read when I logged onto the Stampin' Up! Demonstrator Website this morning!!!

From November 15 through November 30, 2010, Stampin' Up! is offering the Standard or Digital+ Starter Kits for only $107.50--that is 50 percent off the regular price of $215 for over $375 worth of paper or digital crafting and business supplies!  What an amazing deal!!!!

My Digital Studio alone is worth $106.95 - for less than a $1.00 more, you could sign up for the digital starter kit and you would ALSO receive:


  • 2 wood mount stamp sets
  • 1 clear mount stamp set WITH clear block
  • 2 packages of card stock
  • 4 classic ink pads
  • 2 Stampin' Write Markers
  • Buttons
  • Ribbon
  • Stampin' Dimensionals
  • Stampin' Scrub
  • Stampin' Mist
  • Mini Glue Dots
  • Snail Adhesive
  • Decor Elements piece WITH applicator
  • 8 Catalogues
  • Business Supplies, forms and tools


WOW WOW WOW!  I almost want to sign up again just for this AMAAAAZING deal!!!!!  Wouldn't this make a fabulous Christmas Gift????
 
Click here to find additional details regarding this fantastic deal, or here for additional details regarding the Stampin' Up! Business Opportunity.

Still unsure?  Please free to contact me and I would be happy to answer any questions you may have.  Maybe you've been thinking about it for awhile already and are ready to sign up ASAP - if you go to my website you can easily sign up online (Just remember, this amazing opportunity starts on November 15th and is only available until November 30th!) - your starter kit will be delivered directly to your home!!  My recruit password is cfindlay0924.  I would love to have you on my team!

Happy Stamping!


Sunday, November 7, 2010

Running behind...

“Life is what happens to you while you're busy making other plans” ~ John Lennon

Wow, it's amazing how life can get busy and regardless of how well you schedule it, things don't always go to plan!

I'm in the process of redoing my craft room and I thought I'd be finished by now, but unfortunately walls are still being painted and shelves are still not up! Because of that, I haven't really had an opportunity to stamp! I've got some great project ideas in mind though, so hopefully my craft room will be finished soon so I can get back to stamping!!! ;)

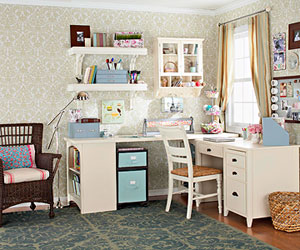
SO, while I don't have any pictures of my personal craft room to show you quite yet, I thought I'd share a few inspiration craft room pics I'd come across online.


courtesy of Flicker


courtesy of lamgarden.com


 courtesy of BHG.com


courtesy of debscountrycrafts.blogspot.com


And who says you need a full room to dedicate to crafting!  If space is tight, check out these amazing "craft rooms in a closet".  GORGEOUS!

courtesy of blog.craftzine.com


courtesy of ohmybettie.com


courtesy of home-designing.com
 
This one may not be a closet, but it would certainly work in one!


Check back soon (I hope) to see some before and after pics of my craft room and see some of the storage solutions I've got in mind that would work in any size crafting space!

 Happy Stamping!


blogger templates | Make Money Online